Commands (JSFL)
Automating tasks in Flash can be done using the History Panel and Commands. Any Commands that you create in Flash are saved as a .jsfl file, which is basically JavaScript for Flash. These files are located in User/Application Support/Macromedia/Flash 8/en/Configuration/Commands. Since it's JavaScript you can tweak the files at your own risk.
The History Panel can be found under Window > Other Panels > History or Command + F8.

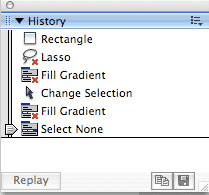
Initially, the History Panel is blank. It has a Replay button in the lower left-hand corner that will play back selected steps. In the bottom right-hand corner there are two buttons, one to copy selected steps to the clipboard and a save button to save selected steps as a command. The Options menu in the upper right-hand corner also allows you to do all of the above, plus you can clear your history.
The History Panel doesn't record everything though, just like Photoshop's History palette. Unlike the workaround's in the History Palette in Photoshop, you don't have any workarounds in Flash. You can however, edit the commands IF they are saved to a .jsfl file. Basically, anytime you select a frame in Flash, it can't record which frame is selected, for whatever reason. Oddly enough, this also means that when you select a layer, invariably Flash also selects the first frame in that layer. The History Panel will show commands that can't be recorded with a red X.
I wanted to see if this would be useful for me, so I set out to create a command that would basically set up a Flash file in the way that I want to. I usually always start out by creating an Actions layer and a Labels layer, plus whatever content layers. So, with a brand new document open, I started by adding the layers and naming them accordingly. When I finished, I selected all of the steps in the History Panel. You can drag across the steps in the Panel to select them or shift + click to select them. Then I clicked on the Save selected steps as a Command button. A warning came up telling me that the steps with the red X cannot be replayed, copied, or saved, and will be skipped. Bummer!!!
I saved the file anyway. When I opened up a new document and ran the Command on it, it didn't work right, as expected. Some things happened correctly, like the creation of a new layer, but that's about it.

Editing the JSFL File
The steps were saved into a .jsfl file in the afformentioned location. I opened it up with BBEdit. The file was easy to read in terms of identifying each step and how it works. Each step is commented, which also helps the identification process. I could see everytime I selected a frame, I would get the resulting code:
fl.getDocumentDOM().getTimeline().setSelectedFrames([]);
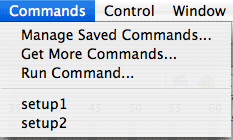
Commenting these lines out allowed the script to work in the way I wanted. Now I can simply use the Command I created to set up a Flash file for the way I work.
You can find loads of Command (JSFL Extensions) at the Adobe Exchange.
The History Panel can be found under Window > Other Panels > History or Command + F8.

Initially, the History Panel is blank. It has a Replay button in the lower left-hand corner that will play back selected steps. In the bottom right-hand corner there are two buttons, one to copy selected steps to the clipboard and a save button to save selected steps as a command. The Options menu in the upper right-hand corner also allows you to do all of the above, plus you can clear your history.
The History Panel doesn't record everything though, just like Photoshop's History palette. Unlike the workaround's in the History Palette in Photoshop, you don't have any workarounds in Flash. You can however, edit the commands IF they are saved to a .jsfl file. Basically, anytime you select a frame in Flash, it can't record which frame is selected, for whatever reason. Oddly enough, this also means that when you select a layer, invariably Flash also selects the first frame in that layer. The History Panel will show commands that can't be recorded with a red X.
I wanted to see if this would be useful for me, so I set out to create a command that would basically set up a Flash file in the way that I want to. I usually always start out by creating an Actions layer and a Labels layer, plus whatever content layers. So, with a brand new document open, I started by adding the layers and naming them accordingly. When I finished, I selected all of the steps in the History Panel. You can drag across the steps in the Panel to select them or shift + click to select them. Then I clicked on the Save selected steps as a Command button. A warning came up telling me that the steps with the red X cannot be replayed, copied, or saved, and will be skipped. Bummer!!!
I saved the file anyway. When I opened up a new document and ran the Command on it, it didn't work right, as expected. Some things happened correctly, like the creation of a new layer, but that's about it.

Editing the JSFL File
The steps were saved into a .jsfl file in the afformentioned location. I opened it up with BBEdit. The file was easy to read in terms of identifying each step and how it works. Each step is commented, which also helps the identification process. I could see everytime I selected a frame, I would get the resulting code:
fl.getDocumentDOM().getTimeline().setSelectedFrames([]);
Commenting these lines out allowed the script to work in the way I wanted. Now I can simply use the Command I created to set up a Flash file for the way I work.
You can find loads of Command (JSFL Extensions) at the Adobe Exchange.

0 Comments:
Post a Comment
<< Home